راهاندازی و استقرار NetBSD بر بستر QEMU/KVM
سیستمعامل NetBSD به پرتابل بودن (Portability)، طراحی ماژولار و کدهای به شدت تمیز شهرت دارد؛ شعار معروف "Of course it runs NetBSD" گواه اجرای آن روی دهها معماری سختافزاری مختلف است. اما در محیطهای زیرساخت و مجازیسازی مدرن لینوکس (بر پایه KVM)، اجرای بهینه و با راندمان بالای NetBSD نیازمند پیکربندی درست شتابدهنده سختافزاری، درایورهای پرسرعت Paravirtualization (مجموعه VirtIO) و مدیریت صحیح کنسول سریال یا گرافیکی است.
در این مستند فنی، مراحل راهاندازی NetBSD 10.x روی QEMU/KVM را از ایجاد دیسک و تعریف سوییچهای عملکردی تا مراحل نصب و تنظیمات پایه بررسی میکنیم.
۱. آمادهسازی ایمیج دیسک با فرمت qcow2
برای کارایی بهتر در لایه استوریج و بهرهگیری از قابلیت Thin Provisioning، یک دیسک با فرمت qcow2 میسازیم:
qemu-img create -f qcow2 netbsd.qcow2 20G
۲. اجرای ماشین مجازی با سوییچهای بهینهسازی (KVM + VirtIO)
برای اینکه بیشترین بازدهی I/O و CPU حاصل شود، از درایورهای پاراویرچوال virtio-net و virtio-blk استفاده میکنیم که در کرنلهای مدرن NetBSD به صورت Native پشتیبانی میشوند:
qemu-system-x86_64 \
    -enable-kvm \
    -m 2048 \
    -smp 2 \
    -cpu host \
    -drive file=netbsd.qcow2,if=virtio,format=qcow2,cache=none \
    -cdrom NetBSD-10.0-amd64.iso \
    -boot d \
    -netdev user,id=net0,hostfwd=tcp::2222-:22 \
    -device virtio-net-pci,netdev=net0 \
    -display default
نکات مهم معماری در این فرمان:
* -cpu host و -enable-kvm: دسترسی مستقیم به Instruction Setهای پردازنده فیزیکی بدون لایه شبیهسازی نرمافزاری.
* if=virtio و virtio-net-pci: حذف سربار درایورهای شبیهسازیشده IDE یا e1000 و ارتباط با باس پرسرعت VirtIO.
* hostfwd=tcp::2222-:22: مپ کردن پورت SSH ماشین مهمان به پورت ۲۲۲۲ هاست جهت دسترسی ریموت بدون نیاز به بریج شبکه.
۳. مراحل نصب از طریق نصاب sysinst
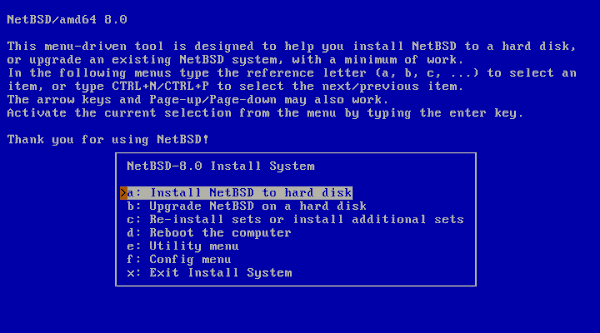
پس از بوت شدن ایمیج، وارد محیط کاربری مبتنی بر کاراکتر (Curses-based) نصاب بومی نتبیاس یعنی sysinst میشوید:
- زبان را روی
a: Installation in Englishانتخاب کنید. - گزینه
a: Install NetBSD to hard diskرا انتخاب نمایید. - درایور دیسک شناساییشده را تایید کنید (به عنوان مثال
ld0که دیسک VirtIO است). - نوع پارتیشنبندی دیسک را بر اساس نیاز انتخاب کنید (برای ماشینهای استاندارد BIOS/MBR گزینه
MBR partitionsیا برای سیستمهای مبتنی بر UEFI گزینهGPT). - فایلسیستم را روی FFSv2 با پشتیبانی لاگینگ (
WAPBL) قرار دهید تا در قطعیهای ناگهانی برق نیازی به اسکن کامل دیسک نباشد. - مجموعه بستههای پیشفرض (
Full installation) را انتخاب کرده و اجازه دهید استخراج بستهها از روی مدیا انجام گیرد.
۴. تنظیمات پس از نصب و آمادهسازی SSH
پیش از ریبوت، چند گام اساسی در منوی پیکربندی نهایی نصاب پیشنهاد میشود:
- تنظیم گذرواژه ریشه (root password): یک پسورد امن برای کاربر root تعیین کنید.
- ایجاد کاربر عملیاتی: ساخت یک کاربر معمولی و عضویت آن در گروه
wheelبرای انجام امور مدیریتی. - فعالسازی سرویس sshd: در صورتی که در مرحله نصب فعال نشد، پس از اولین بوت در
/etc/rc.confخط زیر را اضافه کنید:
sshd=YES
همچنین کارت شبکه به عنوان vioif0 شناخته میشود. برای دریافت خودکار IP از سرویس DHCP در /etc/rc.conf مقدار زیر را اعمال نمایید:
ifconfig_vioif0="dhcp"
۵. بوت نهایی بدون مدیای نصب
پس از اتمام مراحل، ماشین را خاموش کرده و برای بوتهای دائمی، مدیا را جدا کرده و سیستم را بالا بیاورید:
qemu-system-x86_64 \
    -enable-kvm \
    -m 2048 \
    -smp 2 \
    -cpu host \
    -drive file=netbsd.qcow2,if=virtio,format=qcow2,cache=none \
    -netdev user,id=net0,hostfwd=tcp::2222-:22 \
    -device virtio-net-pci,netdev=net0 \
    -nographic
نکته برای محیطهای هدلس سروری: با قرار دادن پرچم
-nographicو هدایت کنسول NetBSD بهcom0در فایل/boot.cfg، میتوانید مستقیماً ترمینال NetBSD را درون TTY شل لینوکسی خود بدون نیاز به پنجره گرافیکی در اختیار داشته باشید.
Deploying and Running NetBSD on QEMU/KVM
The NetBSD operating system is renowned for its portability, modular design, and clean codebase; its famous slogan "Of course it runs NetBSD" bears testament to its ability to run across dozens of hardware architectures. In modern Linux infrastructure and virtualization environments (based on KVM), achieving optimal performance with NetBSD requires proper configuration of hardware acceleration, high-throughput paravirtualization drivers (the VirtIO suite), and appropriate serial or graphical console management.
In this technical guide, we walk through setting up NetBSD 10.x on QEMU/KVM—from creating disk images and configuring performance flags to completing installation and essential post-install setup.
1. Preparing the Disk Image (qcow2 Format)
For optimal storage performance and to leverage thin provisioning capabilities, create a virtual disk in qcow2 format:
qemu-img create -f qcow2 netbsd.qcow2 20G
2. Launching the Virtual Machine with Optimized Flags (KVM + VirtIO)
To achieve maximum I/O and CPU throughput, utilize the virtio-net and virtio-blk paravirtualized drivers, which are natively supported in modern NetBSD kernels:
qemu-system-x86_64 \
    -enable-kvm \
    -m 2048 \
    -smp 2 \
    -cpu host \
    -drive file=netbsd.qcow2,if=virtio,format=qcow2,cache=none \
    -cdrom NetBSD-10.0-amd64.iso \
    -boot d \
    -netdev user,id=net0,hostfwd=tcp::2222-:22 \
    -device virtio-net-pci,netdev=net0 \
    -display default
Key architectural flags in this command:
* -cpu host and -enable-kvm: Direct pass-through of physical CPU instruction sets without software emulation overhead.
* if=virtio and virtio-net-pci: Bypasses emulation layers of legacy IDE or e1000 adapters, utilizing high-speed VirtIO bus communication.
* hostfwd=tcp::2222-:22: Forwards host port 2222 to guest SSH port 22 for convenient remote access without requiring network bridge setup.
3. Installation Steps via sysinst
Once the ISO boots, you enter the curses-based NetBSD installer, sysinst:
- Select language:
a: Installation in English. - Choose
a: Install NetBSD to hard disk. - Confirm the detected disk device (typically
ld0for the VirtIO block device). - Select partitioning scheme according to your firmware (
MBR partitionsfor standard BIOS orGPTfor UEFI). - Format the filesystem as FFSv2 with logging support enabled (
WAPBL) to prevent lengthy fsck scans upon unexpected shutdowns. - Choose the default package set (
Full installation) and proceed with extracting installation sets from the install media.
4. Post-Installation & SSH Configuration
Before rebooting, perform these essential steps in the post-install configuration menu:
- Set root password: Choose a strong password for administrative access.
- Add an operational user: Create an unprivileged user and add them to the
wheelgroup for administrative tasks. - Enable SSH daemon (
sshd): If not enabled during install, append to/etc/rc.conf:
sshd=YES
The VirtIO network interface is recognized as vioif0. Configure dynamic IP allocation via DHCP in /etc/rc.conf:
ifconfig_vioif0="dhcp"
5. Final Boot Without Installation Media
After installation completes, shut down the VM, detach the installation media, and boot permanently from disk:
qemu-system-x86_64 \
    -enable-kvm \
    -m 2048 \
    -smp 2 \
    -cpu host \
    -drive file=netbsd.qcow2,if=virtio,format=qcow2,cache=none \
    -netdev user,id=net0,hostfwd=tcp::2222-:22 \
    -device virtio-net-pci,netdev=net0 \
    -nographic
Tip for headless server setups: Passing the
-nographicflag along with redirecting NetBSD's console tocom0in/boot.cfgallows full serial console interaction right inside your host Linux shell TTY without any graphic window dependencies.